Misaligned garage door tracks can cause your door to stick, grind, or even become unsafe. Fixing these issues yourself is possible with basic tools and attention to safety. Here’s a quick summary of what to do:
- Common signs of misalignment: Light gaps, grinding noises, uneven door movement, or rollers slipping off tracks.
- Tools you’ll need: Adjustable wrench, screwdriver, spirit level, rubber mallet, C-clamps, and safety gear like gloves and glasses.
- Steps to fix: Loosen track bolts, adjust tracks using a level and mallet, ensure proper gaps (1/4 inch for vertical tracks and slight slope for horizontal tracks), and tighten bolts securely.
- Safety first: Disconnect the opener, use the emergency release cord, and avoid handling high-tension springs or cables.
If issues persist or damage is severe (e.g., broken springs, twisted tracks, or detached components), it’s safer to call a professional. DIY fixes can save time and money, but knowing your limits is key to avoiding injuries or further damage.
Tools and Safety Precautions
Required Tools
For this task, you’ll need some basic tools – most of which you probably already have in your toolkit. Start with an adjustable wrench or a socket set to handle mounting brackets, and a screwdriver for smaller hardware. A spirit level is essential to ensure the vertical tracks are straight and the horizontal tracks are angled correctly. A rubber mallet comes in handy for gently nudging tracks into position without causing damage. If you need to reach higher sections, make sure you have a sturdy step ladder.
To stabilize components during adjustments, use C-clamps or locking pliers (like Vise-Grips) to hold the door or tracks in place. Don’t forget to protect yourself – wear heavy-duty work gloves, safety glasses, and close-toed shoes. Keep in mind, a garage door can weigh over 400 pounds[7], so these precautions are no joke.
Safety Guidelines
Before you start adjusting the tracks, make safety your top priority. Disconnect the power to your garage door opener by either unplugging the motor or flipping the circuit breaker. Then, pull the red emergency release cord to disengage the automatic opener. Always keep the door closed while working, as this prevents it from accidentally falling or slamming shut.
“Disconnect the automatic opener. Seriously, unless you want your garage door to suddenly decide it’s a guillotine.” – Classic Max Door Systems
If the door is partially open, secure it with locking pliers to prevent any movement. Avoid adjusting torsion springs, extension springs, or lift cables yourself – these components are under high tension and can cause serious injuries. If you notice issues like broken springs, frayed cables, or severely twisted tracks, stop immediately and call a professional. Hiring a pro for track alignment typically costs between $150 and $300[6].
sbb-itb-cf36777
Inspecting Your Garage Door Tracks
Common Track Problems
Spotting track issues early can save you from bigger headaches down the road. Start with a simple daylight test: close your garage door during the day and check for light seeping through the sides or bottom. If you see any, your tracks might be misaligned [5].
Pay attention to the sounds your door makes when it’s in motion. Unusual noises like scraping, grinding, or squeaking often mean the door isn’t gliding smoothly along the tracks [2]. If the door jerks, slows down, or halts mid-cycle, alignment could be the culprit. Look for gaps between the rollers and the track, or check if the door looks uneven when shut [4].
“A well-aligned garage door should completely shut when closed. There should not be any gaps between the floor and the bottom of the door on one side.” – Titan Garage Doors NE [3]
Another test involves disconnecting the opener and manually lifting the door halfway. If it doesn’t stay in place or feels unusually heavy, there might be a balance issue tied to track misalignment. Also, measure the gap between the edge of the door panel and the track flange – it should generally fall between 1/2 inch and 3/4 inch [7]. Rollers that rub too much on one side or jump off the track are clear signs your alignment needs attention.
Once you’ve identified these problems, it’s time to assess the extent of the damage.
Evaluating Track Damage
After spotting alignment issues, determine whether the tracks need a quick fix or a full replacement. Small dents or bends (up to 1/2 inch) can often be straightened out using a rubber mallet and a wood block [5]. Check for loose mounting brackets, bolts, or screws – give the tracks a gentle shake. If they wobble, repairs are needed immediately [7].
However, severe damage requires more than a DIY approach. Tracks that are heavily twisted, extensively rusted, or damaged near the spring assembly should be replaced [7]. If the tracks are completely detached from their brackets or show structural issues, attempting a repair on your own isn’t safe [5].
Professional help might be the best route in these cases. Labor costs usually range from $75 to $100 per hour, and aligning or repairing tracks typically takes two to four hours per track [5]. If you’re unsure about the damage, calling a professional can help prevent injuries or further harm to your garage door.
How To Adjust Garage Door Tracks
How to Align Garage Door Tracks
Step-by-Step Guide to Aligning Garage Door Tracks
Once you’ve pinpointed the issues with your garage door tracks, you can follow these steps to realign them properly.
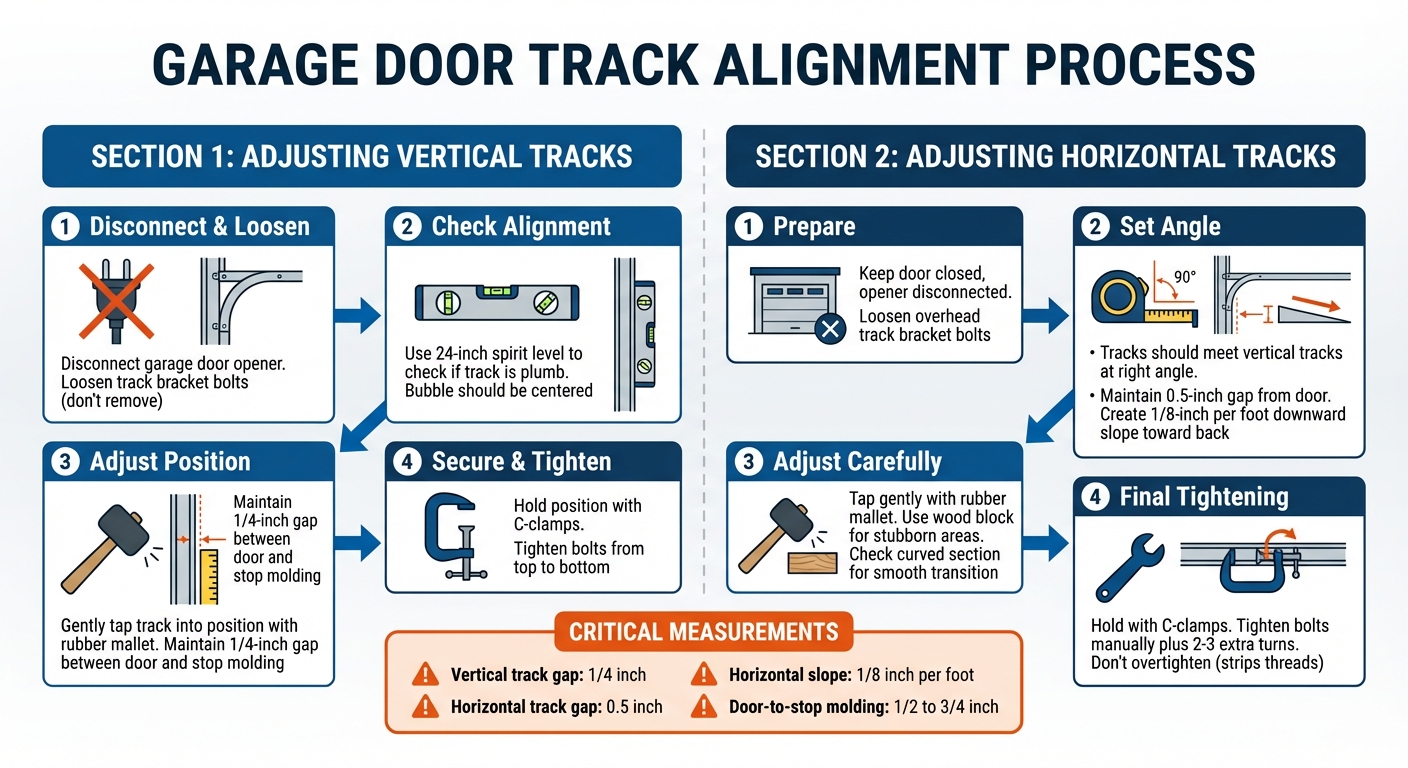
Adjusting Vertical Tracks
Start by disconnecting the garage door opener to ensure safety. Then, slightly loosen the bolts on the track brackets – just enough to allow the track to move.
Using a 24-inch spirit level, check the vertical track to ensure it’s perfectly plumb. The bubble should sit in the center of the level. If the track is misaligned, gently tap it into position with a rubber mallet. Avoid using a metal hammer, as it could dent or damage the track. Aim to maintain a consistent 1/4-inch gap between the door and the stop molding along the track.
Once the track is aligned, secure it temporarily with C-clamps or locking pliers to keep it from shifting. Begin tightening the bolts at the top brackets and work your way down to the bottom. Use a measuring tape to confirm that the gap stays even along the entire track length.
Adjusting Horizontal Tracks
With the garage door closed and the opener still disconnected, loosen the bolts on the overhead track brackets just enough to allow adjustments. The horizontal tracks should meet the vertical tracks at a right angle and maintain a 0.5-inch gap from the door to prevent binding.
Horizontal tracks require a slight downward slope – about 1/8 inch per foot – toward the back of the garage. Use a level and a measuring tape to set this slope accurately. If the track resists adjustment, gently tap it with a rubber mallet. For stubborn tracks, place a block of wood between the track and a hammer to avoid direct impact. Pay close attention to the curved section where the vertical and horizontal tracks connect. This area should be smooth and continuous so the rollers can move freely.
Once the alignment looks good, hold the tracks in place with C-clamps and tighten the bolts manually. Add two or three extra wrench turns to ensure the bolts are secure but not over-tightened, which could strip the threads. Finally, test the door manually by opening and closing it. Check for smooth movement and listen for any scraping or grinding sounds that might indicate further adjustments are needed.
Testing and Fine-Tuning Your Work
Testing Door Operation
Start by disconnecting the automatic opener using the red emergency release cord. Then, lift the door halfway and let go. If the door is properly balanced, it should stay in place when lifted halfway[2,26]. If it moves up or down on its own, the issue likely lies with the spring tension, not the track alignment.
Manually open and close the door several times, paying attention to how it moves along the tracks. The door should glide smoothly without any sticking, rubbing, or resistance[6,18,5]. Look for any jerking or wobbling, and listen for grinding or screeching sounds – these could mean the door is still hitting the tracks or weatherstripping. If you notice any of these issues, move on to fine-tuning as outlined below.
Final Adjustments
If your testing reveals sticking or misalignment, loosen the brackets slightly and use a rubber mallet to gently tap the tracks back into position. Check that the vertical tracks are perfectly plumb and that the horizontal tracks slope slightly downward toward the back. Ensure the gap between the door and the stop molding is consistently about 1/4 inch on both sides[7,18].
When you’re satisfied with the alignment, tighten the bracket bolts evenly, starting at the top and working your way down. Be careful not to overtighten. Once adjustments are complete, apply a silicone-based lubricant to the rollers, hinges, and tracks to minimize friction[2,6,26]. Avoid thick grease, as it can attract dirt and debris, leading to future problems with binding.
When to Call a Professional
Even if you’ve tackled some fixes yourself, there are times when reaching out to a professional is the safest and smartest move. Certain problems, like broken torsion springs or snapped lift cables, are clear indicators that professional help is needed. These components are under immense tension, and mishandling them can lead to severe injuries – or worse [10][11].
“Trying to fix complex issues yourself can be risky – you risk worsening the problem or causing injury.” – Titan Garage Doors Quad Cities [9]
Another red flag is significant track damage. If your tracks are cracked, rusted through, twisted over a long section, or detached from the wall, no amount of DIY alignment will fix the issue [2]. Similarly, if your garage door is completely off its hinges, multiple rollers have jumped the track, or the door is hanging at an unsafe angle, the risk of a collapse is too high to handle alone.
Persistent issues like jerking, binding, or grinding noises often point to deeper mechanical problems [10]. Additionally, if your door feels unusually heavy to lift manually or won’t stay open halfway during a balance test, this suggests a spring tension imbalance that only trained technicians should address [8].
Here’s a quick guide to help you decide when to DIY and when to call in the pros:
| Situation | DIY Safe? | Why Professional Help is Needed |
|---|---|---|
| Minor roller slippage with straight tracks | Yes | Can often be corrected with basic tools |
| Broken torsion spring or cable | No | Components operate under extreme tension, posing injury risk |
| Door entirely off hinges | No | May lead to complete door collapse |
| Severely bent or twisted tracks | No | Likely requires specialized tools or full replacement |
For those in the Quad Cities area, Titan Garage Doors Quad Cities offers specialized services, including track repair, full track replacement, and comprehensive maintenance. They even provide 24/7 emergency services for urgent repairs. Costs for professional fixes typically range from $100 to $300 for basic off-track repairs, while full track realignment can cost between $200 and $350 [11]. Labor rates generally fall between $75 and $100 per hour, with most repairs completed in under an hour [10].
Conclusion
Start by disconnecting the power, securing the door, and inspecting the tracks for any debris, dents, or loose brackets. Loosen the mounting hardware and use a spirit level to check that the vertical tracks are perfectly straight, while the horizontal tracks should slope slightly – about 1/8 inch per foot – toward the back [2]. If needed, gently tap the tracks with a rubber mallet to adjust them.
Once everything is aligned, tighten the hardware and test the door by lifting it halfway. If it stays in place, the balance is correct. To finish, apply a silicone-based lubricant to the tracks. This reduces friction without attracting dust or dirt [1][13].
“Ensuring your garage door track is aligned properly is essential for keeping your home secure and avoiding potential injuries.” – Space Coast Garage Door LLC [12]
If these steps don’t solve the problem, it’s time to call in a professional. Issues like broken springs, frayed cables, or severely damaged tracks require expert attention. Titan Garage Doors Quad Cities offers specialized repairs, full replacements, and even 24/7 emergency services. Taking the time to align your tracks correctly not only extends the life of your garage door but also enhances the safety of your home. Following these straightforward steps keeps your door operating smoothly and securely.
FAQs
How do I know if it’s the tracks or the springs?
To figure out what’s wrong with your garage door, pay attention to how it operates:
- Springs problem: If the door feels unusually heavy, is difficult to lift manually, or doesn’t stay in place when open, the springs might be the culprit.
- Track problem: Look for signs like a crooked door, scraping noises, or visible misalignment and gaps along the track.
When in doubt, it’s safer to contact a professional for help.
Can I align tracks if the door is off the rollers?
No, you can’t align garage door tracks correctly if the door is off the rollers. Before adjusting the tracks, the door needs to be placed back onto the rollers. Proper alignment depends on the door being securely positioned on the rollers to function as intended.
What should I do if the track won’t move after loosening the bolts?
If the track doesn’t budge after loosening the bolts, take a closer look for any signs of damage, rust, or debris. If the track is bent, you can try to carefully realign it using a rubber mallet. For issues caused by rust or debris, clean the track thoroughly and apply a proper lubricant to ensure smooth operation. However, if the track is heavily bent or damaged, replacing it or calling a professional might be the best course of action. Remember to disconnect the opener and manually support the door to stay safe while working.