When your garage door remote stops working, the most common culprit is a dead battery. Replacing it is simple and takes just a few minutes. Here’s a quick guide:
- Signs You Need a New Battery: Reduced range, delayed response, or a dim LED light.
- Tools You Need: Small screwdriver, a clean cloth, and the correct replacement battery (e.g., CR2032, CR2025, or A23).
- Steps to Replace:
- Open the battery compartment using a screwdriver or by sliding it open.
- Remove the old battery, noting its orientation (+/-).
- Clean the contacts if needed.
- Insert the new battery, ensuring proper polarity.
- Test the remote before closing it up.
To extend battery life, store your remote in a cool, dry place and avoid extreme temperatures. Dispose of old batteries at a recycling center to prevent environmental harm. If issues persist after replacing the battery, reprogram the remote or consult a professional.
Replacing the battery ensures your remote works reliably and avoids further damage caused by weak batteries.
Replace Your Garage Opener Remote Battery – EASY DIY
Tools and Materials You’ll Need
Before you dive in, make sure to gather everything you’ll need for the job.
Basic Tools
To access the battery compartment, you’ll need the right tool. A small flathead screwdriver is handy for prying open snap-on covers or releasing batteries. If your remote has security screws, grab a Phillips-head screwdriver. Some remotes even slide open easily with a coin, a metal visor clip, or just your fingertip.
It’s also helpful to have a small tray or dish nearby to hold screws so they don’t get lost. If you notice any dirt or grime on the battery contacts, clean them gently with a dry cloth or a cotton swab dipped in rubbing alcohol.
Battery Types
Make sure you have the correct replacement battery for your remote.
Most modern garage door remotes rely on 3-volt lithium coin-cell batteries. The CR2032 is the most common, but you might also encounter the thinner CR2025 or the larger CR2450. For older or long-range remotes, a small cylindrical A23 12-volt battery might be required.
You can usually find the required battery type printed directly on the battery or embossed inside the compartment. It’s important to match the code exactly – incorrect voltage can damage your remote’s internal components. For example, a CR2032 is 3.2 mm thick, while a CR2025 is 2.5 mm thick. Using a thinner battery in a slot designed for a thicker one could cause a loose connection and failure. If you’re unsure, bring the old battery to a hardware or auto parts store to find an exact match.
How to Replace Your Garage Door Remote Batteries
Step 1: Open the Battery Compartment
Garage door remotes usually have sliding covers, snap-together casings, or panels secured by screws. To open yours, slide the cover by applying light pressure, use a flathead screwdriver to gently pry open snap-together casings, or remove the tiny Phillips screw holding the panel in place. Be sure to set aside any screws so they don’t get lost.
If the casing seems stuck, check for hidden screws. They’re often tucked behind a visor clip or under a label. Don’t force it open until you’ve checked thoroughly. Once the compartment is open, you can move on to removing the old battery.
Step 2: Remove the Old Battery
Take note of how the battery is positioned before removing it. Use a fingernail or a plastic tool to lift the battery out. Avoid using metal tools – they could damage the contacts.
If you notice any corrosion on the contacts, clean them before proceeding. This will ensure the new battery connects properly.
Step 3: Insert the New Battery
Match the new battery’s polarity to the markings inside the compartment. For most coin-cell batteries, the positive (+) side faces up or away from the circuit board. Press the battery into place firmly to ensure it’s seated properly and making good contact.
Try to avoid touching the battery with your bare hands. Skin oils can interfere with conductivity and reduce the battery’s lifespan.
Step 4: Test the Remote
Before reassembling the remote, test it near the garage door. Press the button and check for a blinking LED and smooth door operation. If it doesn’t work, double-check the battery’s orientation and ensure the contacts are clean.
Still not working? You might need to reprogram the remote. Press the “Learn” button on the garage door motor unit, then press the remote button to re-establish the connection.
Step 5: Close the Remote
Once the remote is functioning, close it up. Snap the cover back into place or reinsert the screw, tightening it gently.
If you cleaned corrosion earlier, test the remote again after reassembly to make sure everything is still working as expected.
sbb-itb-cf36777
How to Make Your Batteries Last Longer
Taking care of your batteries can help ensure your remote performs well and lasts longer after a replacement.
Store Your Remote Properly
Temperature extremes are a battery’s worst enemy. High heat speeds up chemical reactions inside the battery, draining it faster, while freezing temperatures reduce its power output [2]. To avoid these issues, keep your remote indoors and away from direct sunlight, which can damage battery components. Also, store it in a dry spot to prevent moisture from corroding the battery contacts [2][5].
Track Battery Replacement Dates
On average, garage door remote batteries last between one and two years with normal residential use [1]. Some may even stretch to five years, depending on the type of battery and how often you use the remote [3]. To stay on top of this, mark the installation date on your remote or set a reminder for 18 months. If you notice the remote’s range decreasing, it’s time to replace the battery. These simple steps can keep your remote dependable between replacements.
Dispose of Batteries Properly
Don’t just throw old batteries in the trash – they contain materials that can harm the environment when left in landfills [2][7]. Instead, take them to a designated recycling drop-off point, such as a hardware store, electronics retailer, or community recycling center [2]. Many stores that sell batteries also accept old ones for recycling. This process helps recover materials like zinc, manganese, and steel from alkaline batteries, or lithium, cobalt, and nickel from lithium-ion batteries, which can be reused in new products [6].
When to Call a Professional
Following these tips should keep your remote in good shape, but if issues persist, it’s time to seek professional help. For instance, if your remote still doesn’t work after replacing the battery and reprogramming it, the problem could be a faulty logic board, a malfunctioning receiver, or interference from nearby LED lights [3][2][5]. Companies like Titan Garage Doors Quad Cities provide 24/7 support for remote-related problems.
Battery Type Comparison
Garage Door Remote Battery Types Comparison Chart
Garage door remote batteries vary in shape, voltage, and performance. While modern remotes often use flat, coin-shaped lithium batteries, older models might require different types. To ensure compatibility, always check the battery code printed on your remote or its existing battery. Knowing these distinctions is key to troubleshooting remote issues effectively.
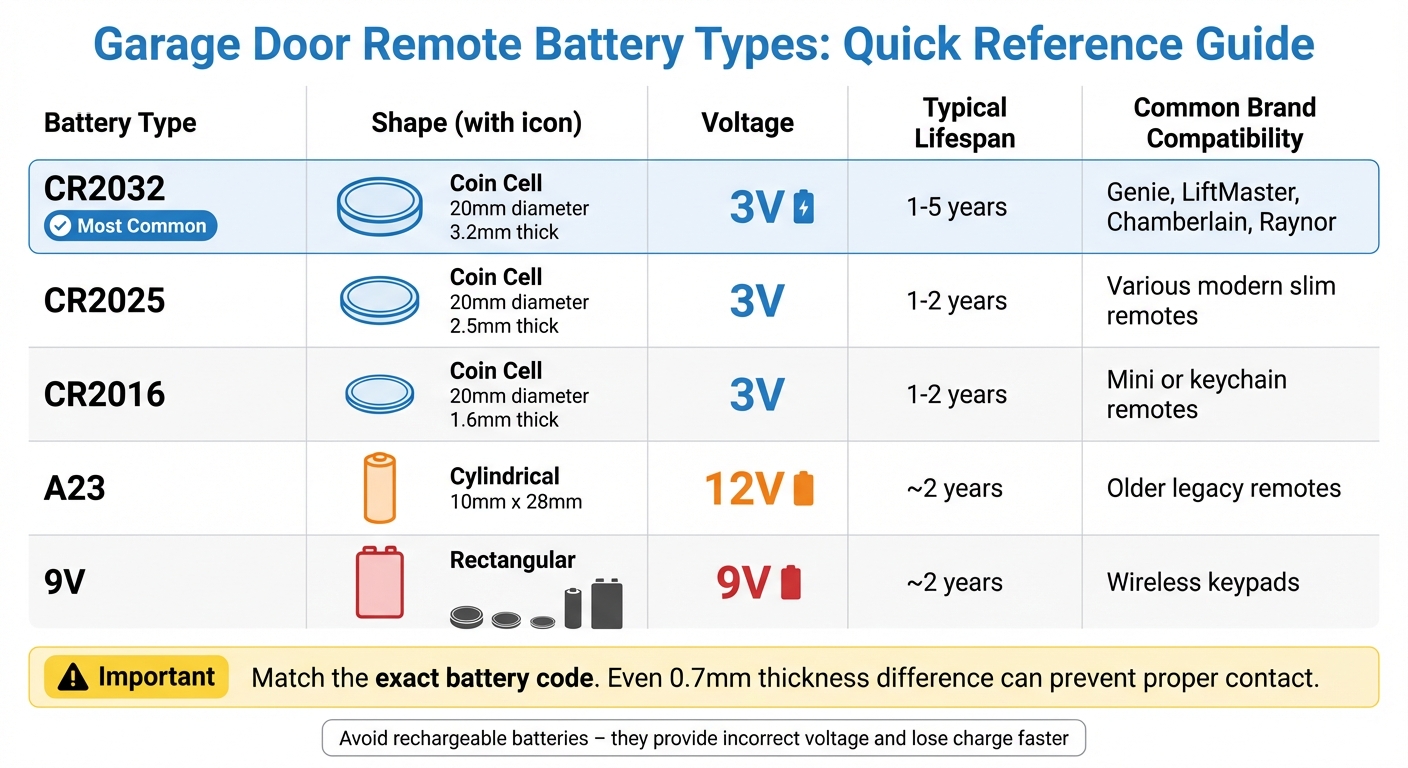
The CR2032 is the most widely used battery in today’s remotes, powering popular brands like LiftMaster, Chamberlain, Genie, and Raynor [3]. This coin cell provides 3V and lasts between one to five years, depending on usage. Older remotes, on the other hand, frequently use the A23, a 12V cylindrical battery typically found in legacy models. Using the wrong voltage can cause your remote to malfunction [3]. Below is a detailed comparison of common battery types:
Battery Specifications Table
| Battery Type | Shape | Voltage | Typical Lifespan | Common Brand Compatibility |
|---|---|---|---|---|
| CR2032 | Coin Cell | 3V | 1–5 years | Genie, LiftMaster, Chamberlain, Raynor |
| CR2025 | Coin Cell | 3V | 1–2 years | Various modern slim remotes |
| CR2016 | Coin Cell | 3V | 1–2 years | Mini or keychain remotes |
| A23 | Cylindrical | 12V | ~2 years | Older legacy remotes |
| 9V | Rectangular | 9V | ~2 years | Wireless keypads |
When choosing a replacement, pay attention to the thickness of coin cells. For example, the CR2032 is 3.2 mm thick, while the CR2025 is thinner at 2.5 mm [8]. Even a small 0.7 mm difference can prevent proper contact, so it’s crucial to match the exact battery code from your old battery.
Lastly, avoid using rechargeable batteries in your remote. Rechargeable options often provide incorrect voltage and lose charge faster, leading to frequent signal issues [8]. Stick to non-rechargeable batteries for optimal performance.
Conclusion
Changing the battery in your remote is a straightforward process. Open the battery compartment, check the polarity, remove the old battery, and replace it with a new one. If the remote still doesn’t work, try reprogramming it using the “Learn” button on your garage door opener motor [3][2]. This quick fix can help avoid future problems.
To make your batteries last longer, take a few precautions. Keep the remote away from your car’s dashboard, as extreme heat or cold can drain the battery faster [2]. When changing the battery, clean the metal contacts with rubbing alcohol or a pencil eraser to ensure a reliable electrical connection [2][4].
If replacing the battery and reprogramming the remote doesn’t solve the issue, there might be a deeper problem. Faulty internal circuitry, debris inside the remote, or even interference from LED lights could be the culprits [2][9]. In some cases, the garage door opener unit itself might need attention [9][10].
For stubborn problems that go beyond basic troubleshooting, Titan Garage Doors Quad Cities is ready to help. Their skilled technicians can identify whether the issue lies with the remote, the opener, or other components of your garage door system. Professional assistance is just a call away.
FAQs
Why isn’t my garage door remote working after I replaced the battery?
If your garage door remote isn’t working even after replacing the battery, there are a few steps you can take to troubleshoot the issue. Start by looking for signal interference caused by nearby devices or electronic equipment. Also, examine the remote for any physical damage, like cracked buttons or a loose battery compartment. Double-check that the battery is installed properly, ensuring the positive and negative ends match the markings inside the remote.
Still having trouble? Try reprogramming the remote to re-establish its connection with the garage door opener. You might also reset the remote by removing the battery, waiting a few seconds, and then reinserting it. If none of these fixes work, the issue might lie with the garage door opener itself. In that case, reaching out to a professional service, such as Titan Garage Doors Quad Cities, could save you time and effort.
How do I find the right battery for my garage door remote?
To identify the right battery for your garage door remote, start by removing the old battery. Look for a label or a series of numbers, such as CR2032, printed on the battery. These numbers specify the size and voltage you’ll need. If the label is hard to read, check your remote’s user manual or visit the manufacturer’s website for more details.
To make your battery last longer, opt for high-quality options and keep your remote away from extreme temperatures. For additional help, Titan Garage Doors Quad Cities is ready to assist with any garage door concerns.
Why is it important to dispose of old batteries safely?
Proper disposal of old batteries plays a crucial role in safeguarding both the environment and human health. Batteries often contain harmful substances like lead, mercury, and cadmium. If these toxins are not handled properly, they can seep into the soil and water, posing risks to ecosystems, wildlife, and even drinking water supplies.
To minimize this impact, make it a habit to recycle used batteries at designated recycling centers or drop-off locations near you. Many stores and local programs provide easy and accessible ways to ensure batteries are disposed of safely. This small action can make a big difference by keeping hazardous materials out of the environment and promoting a cleaner, healthier planet.