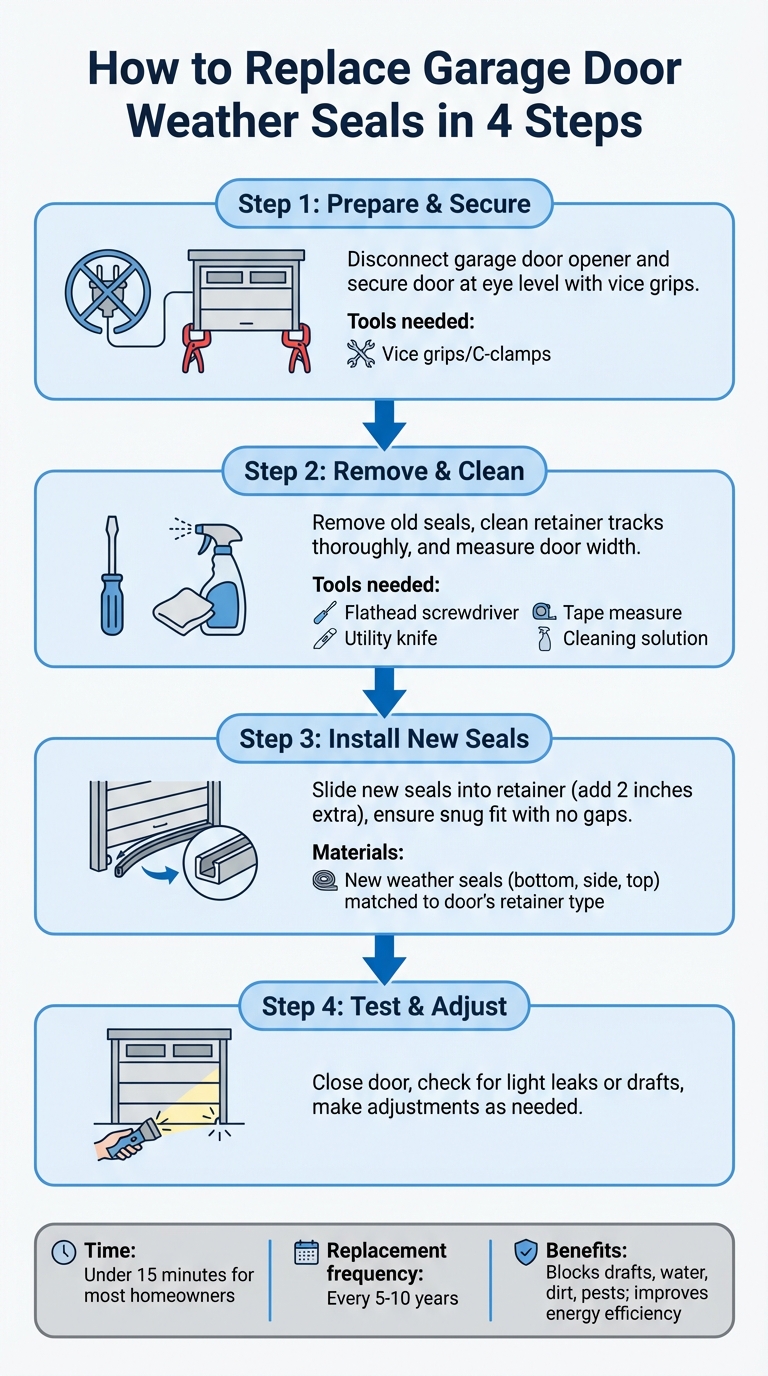
Replacing garage door weather seals is a simple DIY task that keeps your garage comfortable, secure, and energy-efficient. These seals block drafts, water, dirt, and pests while helping maintain a steady temperature. Over time, they wear out and need replacing every 5–10 years. Here’s a quick overview of what you’ll need and how to do it:
- Tools: Flathead screwdriver, utility knife, tape measure, vice grips, cleaning solution.
- Materials: New weather seals (bottom, side, and top), matched to your door’s retainer type.
- Steps:
- Disconnect the garage door opener and secure the door at eye level.
- Remove old seals, clean the retainer tracks, and measure for replacements.
- Install new seals, ensuring a snug fit with no gaps.
- Test for light leaks or drafts and make adjustments as needed.
Regular maintenance extends the lifespan of seals and improves their performance. If your garage has uneven floors or extreme weather, consider specific seal types like brush seals or flexible rubber. Follow these steps to protect your garage and cut down on energy costs.
4-Step Guide to Replacing Garage Door Weather Seals
How to Replace Garage Door Weather Stripping
sbb-itb-cf36777
Tools and Materials Needed
Having the right tools and materials on hand can make this project quick and straightforward – most homeowners finish it in under 15 minutes [3].
Basic Tools
You’ll need a few essential tools to get started:
- A flathead screwdriver for removing screws or prying open channels [2][3].
- A utility knife or razor blade to cut away the old seal and trim the new one to size [3].
- A measuring tape to measure your door width (typically around 9 ft for single-car garages and 16 ft for double-car garages) [3].
- Vice grips or C-clamps to hold the door securely at eye level during the process [3].
- A cleaning solution, like mild detergent or a soap-based window cleaner (e.g., Windex), for cleaning the retainer track before installation [3].
Weather Seal Materials
Choosing the right seal for your garage door is crucial. Match the seal to your door’s retainer type – options include T-type, J-type, Beaded, P-bulb, or wood retainers [3]. To ensure the correct fit, cut a 2–3 inch sample from your existing seal and use it to compare profiles when selecting a replacement [3].
Standard seal profiles typically measure between 3.5 inches and 4.5 inches, though wider options (up to 6 inches) are available for larger gaps [3]. When cutting the new seal, always add an extra 2 inches (1 inch per side) to account for adjustments and potential material shrinkage over time [2].
Optional Items
A few optional items can make installation easier and more effective:
- Dish soap or lubricant spray to reduce friction when sliding the new seal into the track [3].
- A foam backer rod or an old garden hose inserted into the U-shaped seal to prevent flattening over time [3].
- For sloped or uneven garage floors, consider adding a threshold seal on the floor itself to create a better barrier against water intrusion [3].
With everything ready, you can confidently move on to removing the old seal and installing the new one.
Safety Precautions Before Starting
Before tackling your garage door weather seal replacement, taking a few safety steps is crucial. Garage doors can shift or move unexpectedly if not secured, which can lead to accidents. Following these steps will help you work safely and confidently.
Disconnect Power
Start by unplugging the garage door opener from the power outlet. This ensures the door won’t activate while you’re working. Next, pull the emergency release cord to disengage the door from the motorized system. This allows you to manually operate the door. Always make sure the door is disconnected from the opener before lifting it by hand [2].
Secure the Door
Once the opener is disengaged, lift the door to a comfortable height – about chest or eye level – so you can access the bottom seal easily. Use vice grips or C-clamps to secure the door by clamping them on the track just below a roller. For added safety, wear gloves to protect your hands from sharp edges and eye protection to guard against debris [4].
Step-by-Step Replacement Process
Removing Old Seals
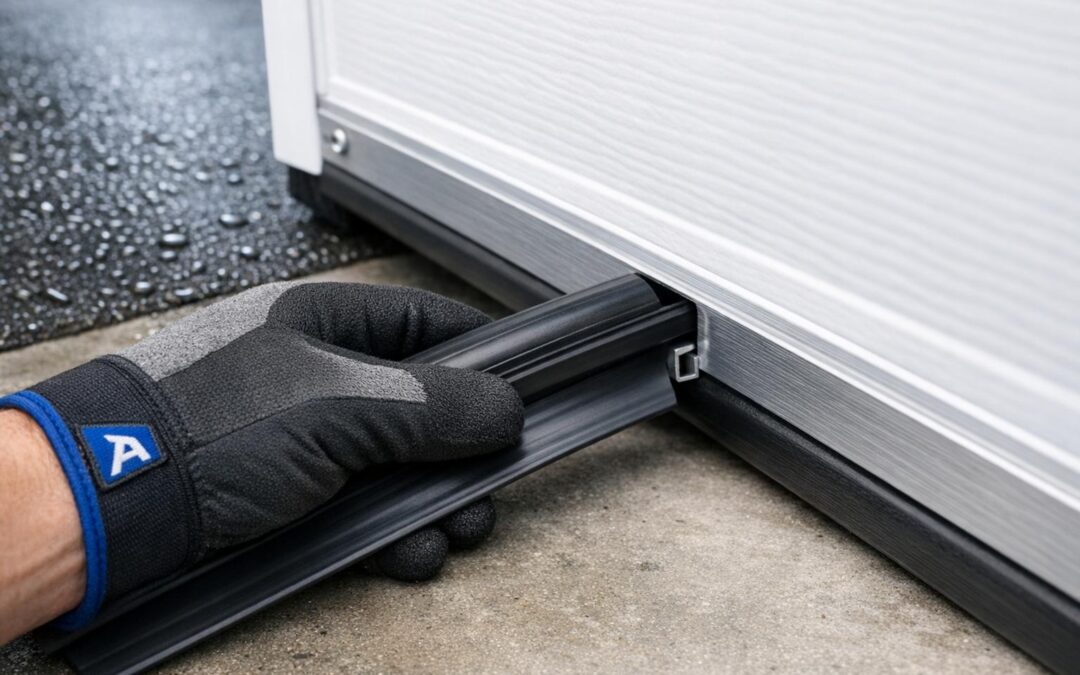
To start, slide the old bottom seal out of the aluminum retainer channel. If it’s stuck, check for small screws at the ends of the retainer and remove them. For hardened seals, use a utility knife to cut them into sections for easier removal. Once the seal is out, clean the retainer and frame thoroughly with a damp cloth or detergent to remove dirt and debris. Run a screwdriver along the entire length of the retainer channel to clear out any hidden snags or leftover debris that could damage the new seal during installation.
For side and top seals, use a pry bar, hammer, or flathead screwdriver to lift the weather stripping off the door frame. Place the tool near each nail and push outward carefully to avoid damaging the frame. If the aluminum retainer channels get bent during removal, straighten them with needle-nose pliers so the new seal can slide in smoothly.
Once the old seals are removed and the retainer is cleaned and prepped, you’re ready to measure and cut the new seals.
Measuring and Cutting New Seals
Measure the full width of your door and add an extra 2 inches to ensure proper edge coverage. Before buying a replacement, confirm the type of seal you need and measure the width of your old seal. Common sizes are 3.5 inches and 4.5 inches, but seals as wide as 6 inches are available for uneven floors or low spots.
With these measurements in hand, you’ll be ready to install the new seals.
Installing New Bottom Seals
To make installation easier, lubricate the retainer track with a soap-based cleaner. Slide the new gasket into the retainer track, ensuring it extends 1 inch beyond the door’s edge on both sides. Pull an additional 5 inches of the seal through the track, then fold the excess into the channel. Lower the door to check that the seal makes full contact with the floor and there are no visible gaps. Once satisfied, trim any extra material with a utility knife or fine-tooth saw, being careful not to damage the door.
Installing Side and Top Seals
Cut the side and top seals to the correct length, then attach them securely to the door frame. Use adhesive, nails, or screws based on your door’s construction. When possible, reuse the existing screw holes to avoid unnecessary damage to the surface and insulation. Ensure the seals fit snugly without leaving gaps that could let air or water seep through.
Testing and Adjusting the Seals
Inspecting for Proper Fit
Start by closing the door completely and carefully examining its edges. If you notice any light sneaking through, that’s a clear indicator of a gap in the seal. Walk around the door and check for these light leaks. To go a step further, run your hand slowly along the edges to feel for drafts. Pay special attention to the bottom seal – check for moisture on the floor after rain or snow. Any signs of water mean the seal isn’t making proper contact with the ground.
Next, give the weather stripping a gentle tug to ensure it’s securely attached. If it feels loose or looks saggy, it might need reinforcement. The seal should lie smoothly against the door frame without any wrinkles or raised spots, as these can allow air or debris to pass through.
If you spot any gaps or loose areas, it’s time to make some adjustments.
Making Adjustments
For any gaps or light leaks, start by pressing the seal firmly into place. If the seal is misaligned, peel back the problematic section, clean both surfaces with warm water and a mild detergent, and then secure it again using a strong adhesive or high-quality caulking.
As experts recommend:
“If the weather stripping is simply loose or misaligned, you may be able to reposition it rather than replacing it. Try reattaching the stripping using a strong adhesive or caulking.” – Clopay Door [1]
For smaller gaps that persist even after adjustments, applying caulk can help seal them up. If the issue is caused by uneven floors, consider switching to brush seals, which can adapt better to those variations.
Common Mistakes and How to Avoid Them
Once you’ve installed your new weather seals, it’s crucial to be aware of common mistakes that could undermine your work. Missteps during weather seal replacement can reduce their effectiveness and leave your space vulnerable to drafts, water, or pests. Here’s how to avoid some of the most frequent errors.
Choose materials suited to your climate. While standard vinyl seals might seem like a cost-effective option, they tend to crack and become brittle in extremely cold weather. If you live in an area with freezing temperatures, opt for flexible rubber seals that can withstand harsher conditions.
Avoid measurement errors. Incorrect measurements can lead to significant issues during installation. Always measure beyond the exact width of the door – add an extra inch on each side to ensure there are no gaps. Additionally, selecting the wrong seal profile, like using a 3/16″ Bulb seal when a 1/4″ T-shaped seal is needed, can result in a poor fit and reduced performance [5].
Check door alignment and track levels. Before installing the new seal, make sure the door tracks are level and the door itself is properly aligned. A crooked door or uneven tracks can cause the seal to wear unevenly, leaving gaps that compromise its effectiveness.
Common Mistakes and Their Solutions
| Mistake | Consequence | Prevention |
|---|---|---|
| Skipping cleaning | Weak adhesion, debris buildup | Wipe the area with detergent before installing |
| Incorrect measurements | Gaps or bunching | Measure twice and dry-fit the seal first |
| Using the wrong seal type | Ineffective sealing | Match the seal to your door retainer style and climate |
Don’t overlook corner gaps. Even when the main seal fits well, small gaps at the corners can allow drafts and pests to sneak in. Standard seals often don’t cover corners perfectly, so consider adding foam tape or extra weatherstripping to close these gaps. For uneven floors, brush seals are a great option as they can adjust to varying heights [1].
Conclusion
Taking the time to replace your garage door weather seals can make a big difference for your home. By carefully measuring, cleaning the surface, and installing new seals, you create a strong barrier against the elements. This simple project helps maintain a consistent temperature, blocks drafts, prevents moisture issues, and keeps pests at bay.
Weather seals also help lower energy bills and protect your tools, equipment, and vehicles while making your garage more comfortable. As Clopay explains:
“By keeping cold air out and warm air in during winter and vice versa in the summer, garage door weather stripping helps your garage stay at a consistent temperature.” [1]
Inspect your seals regularly and plan to replace them every 5–10 years. Cleaning them with mild detergent and warm water can extend their lifespan, and selecting the right material – such as rubber for cold climates, vinyl for humid conditions, or brush seals for uneven floors – ensures they perform well in your specific environment. If you’re short on time or want a flawless result, professional assistance can be a great option.
For homeowners seeking expert help, Titan Garage Doors Quad Cities offers professional installation and maintenance services. Their technicians can guide you in choosing the best materials for your climate and provide precise installation, thorough cleaning, and adjustments to maximize the seal’s effectiveness. Whether you need a full replacement or want to pair weather stripping with an insulated garage door, professional support ensures a snug fit and long-lasting performance.
FAQs
How do I know which bottom seal profile fits my garage door?
To choose the correct bottom seal profile for your garage door, start by examining the shape and size of the ends that fit into the track grooves on the door’s bottom bracket. Take a small piece of your existing seal and compare its profile to common types like 5/16″ T-shaped ends, 3/16″ bead ends, or 1/4″ T-shaped ends. These profiles come in various widths, so make sure to match both the shape and size accurately.
What seal works best if my garage floor is uneven or sloped?
A threshold seal works perfectly for garage floors that are uneven or sloped. It closes gaps by pressing firmly against the back of the garage door. For added protection, pair a bottom gasket seal on the door with a threshold seal on the floor. This combination creates a tighter seal, offering better coverage and efficiency.
When should I replace weather seals instead of just reattaching them?
If your weather seals are damaged, cracked, dry-rotted, or failing to keep out wind, rain, snow, or insects, it’s time to replace them. Sometimes, if the seals are just loose or detached, you might be able to reattach them. But when they become brittle or dried out, a full replacement is the smarter choice.